VTS: Basic Single-Site Topology
This example walks through creating a simple VTS topology with one forwarding element (an Open vSwitch instance) connected to two virtual machines provided by the site compute aggregate. Resources for this request will come from two different aggregate managers at the same site, using information returned from the VTS aggregate to structure the second request to the compute aggregate.
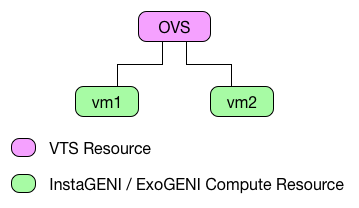
The resultant topology will be as in the diagram below. The resources are color-coded to indicate which aggregate will provision them:
This obviously has no advantage over having the local site compute aggregate connect the VMs directly, but it serves as the simplest example of how to stage the provisioning of VTS resources and forms the basis for more advanced use cases.
Note
This example requires that you have set up a valid context object with GENI credentials.
Set up VTS Sliver
For this example we’ll use InstaGENI compute resources, but this would work for ExoGENI sites that have VTS support as well if you change the InstaGENI imports to the relevant ones for ExoGENI.
We need to set up basic imports to create requests and send them to the aggregate:
import geni.rspec.pg as PG
import geni.rspec.igext as IGX
import geni.rspec.vts as VTS

import geni.aggregate.instageni as IGAM
import geni.aggregate.vts as VTSAM
Here we also set up the slice name you’re going to use, as well as the context object that specifies your credential information. If you set up your
geni-libusing the GENI Portal Import method, the code below will directly work. If you built a custom context using Python code you will need to replace the code below to load your custom context:import geni.util context = geni.util.loadContext() SLICENAME = "my-slice-name" # Change this to be your slice name
Note
If you do not have a slice available in your project, you may need to go back to the GENI Portal web interface and create a new slice.
VTS reservations are a two-stage process, where the VTS resources must be reserved first and the results used to create the proper compute request:
vtsr = VTS.Request()
First we select the image we want to use for our VTS forwarding elements:
image = VTS.OVSL2Image()
Note
Images support varying functionality that can be configured here, such as sflow and netflow collectors, openflow controllers, etc.
We then instantiate a single forwarding element with this image, and request two local circuits to connect to our VMs:
felement = VTS.Datapath(image, "fe0")
felement.attachPort(VTS.LocalCircuit())
felement.attachPort(VTS.LocalCircuit())
vtsr.addResource(felement)
Now the request object is complete - we need to contact the aggregate and have it build our topology for us:
manifest = VTSAM.UtahDDC.createsliver(context, SLICENAME, vtsr)
Note
If you are at an in-person tutorial at GEC, etc., please replace VTSAM.UtahDDC
with the aggregate you have been given on your tutorial worksheet.
Set up InstaGENI Compute Sliver
The VTS aggregate manager returned to us a manifest containing information about the resources we have provisioned - specifically identifying information about the local circuits we requested. We will now use this information to request compute resources and connect them to the VTS sliver.
Initialize a basic GENI compute request:
igr = PG.Request()
The VTS Manifest object allows us to iterate over the local circuits that were returned, and we’ll make a VM with a single interface and link for each one, and give them IPs in the same subnet:
IP = "10.50.1.%d"

for idx,circuit in enumerate(manifest.local_circuits):
  vm = IGX.XenVM("vm%d" % (idx))
  intf = vm.addInterface("if0")
  intf.addAddress(PG.IPv4Address(IP % (idx+1), "255.255.255.0"))
  igr.addResource(vm)

  lnk = PG.Link()
  lnk.addInterface(intf)
  lnk.connectSharedVlan(circuit)
  igr.addResource(lnk)
There is a lot of code above, but the workflow is fairly simple:
First, we set up a simple string substitution so we can add a small number of IP addresses in the same subnet (otherwise the compute AM will give the interfaces IP addresses in different subnets and you will have to fix them after you log into the nodes).
Next we iterate over all of the circuits returned from the VTS AM that match a certain type (“local”), while using the Python
enumeratebuilt-in to maintain a counter.For each circuit we create a VM object, add an interface to it, give that interface a unique IP address on our chosen subnet, and add that interface to a
Linkobject, along with the circuit ID (which in this case is a shared VLAN).
Now we just need to make the reservation and wait for our nodes to come up:
igm = IGAM.UtahDDC.createsliver(context, SLICENAME, igr)
geni.util.printlogininfo(manifest = igm)
Note
If you are at an in-person tutorial at GEC, etc., please replace IGAM.UtahDDC
with the aggregate you have been given on your tutorial worksheet.
In a few minutes you should be able to log into your VMs with the info printed out by the above step and send test traffic (ping, etc.) between the VMs across your VTS topology.
Once you are done using your topology and exploring the tutorial, please delete all the resources you have reserved:
IGAM.UtahDDC.deletesliver(context, SLICENAME)
VTSAM.UtahDDC.deletesliver(context, SLICENAME)