10 Storage Mechanisms
10.1 Overview of Storage Mechanisms
CloudLab offers a convenient way to specify storage resources in a profile. A blockstore, more commonly known as a dataset, is an abstraction of a block-addressable storage container of a specified size. Think of a dataset as a virtual disk that only your experiments can access. The most common way to use a dataset’s capacity is to make a filesystem on it, though that is up to the user.
A dataset may either be local, allocated on a node disk and directly accessed by the OS, or remote, located on a shared storage server and accessible via the experiment network fabric.
Datasets may also be either ephemeral, where the content lasts only as long as its referencing experiment, or persistent, where the lifetime is independent of an experiment and can thus be used across multiple successive experiments. Note that local datasets are always ephemeral, since node disks are re-imaged after every experiment use. (There is a pseudo-dataset type, the image-backed dataset, that can be used to explicitly capture the contents of a local dataset in a reusable way). Remote datasets can be ephemeral or persistent.
Persistent datasets may be either short-term or long-term. This is a policy distinction and not a technical one. The former is intended to allow fixed-duration (e.g., one week) access to larger datasets with fewer administrative hurdles. The latter is intended for longer term (e.g., months to years) ongoing access to size-limited datasets. Long-term datasets remain alive as long as they are being regularly used, but their creation is subject to per-project quotas for total size and might require interaction with CloudLab staff.
Persistent datasets may also be cloned, giving individual nodes their own mutable copy of a dataset. Currently, these clones are ephemeral, with per-node changes lost at experiment termination. This limits their utility. In the future, we plan to allow clones to be promoted to new persistent datasets, and allowed to replace the dataset they are cloning.
Datasets are not the only form of storage available to users. There is a legacy shared NFS filesystem that allows convenient but limited concurrent sharing between nodes within and across experiments.
All local storage is ephemeral. The contents of node disks will be lost when an experiment is terminated. You are responsible for saving data from local disks.
Most of these storage mechanisms are intra-cluster only. For example, a persistent dataset at Utah cannot be directly used by an experiment running on Clemson nodes. A new dataset would have to be created at Clemson, and the content explicitly copied over by the user from the Utah dataset. Likewise, the shared NFS filesystem at one cluster is independent of the shared filesystem at another cluster. Inter-cluster sharing mechanisms, e.g., scp or rsync, must be provided by the user at this time. The one exception is the Image-backed Dataset described below, which can be moved between clusters.
All of these storage mechanisms are subject to failure. CloudLab is not a storage provider. It is ultimately up to the users to make sure that important data artifacts are preserved. Node disks in particular are prone to failure; we do not configure them in any redundant way. Infrastructure services such as the iSCSI storage servers and the NFS servers have reasonable protection against hardware failures (e.g., RAID or ZFS), but most clusters do not have off-site backup of user data. If your data is important, back it up!
The following sections more concretely describe the storage resources and workflows available to CloudLab users.
10.2 Node-Local Storage
All nodes in CloudLab have at least 100GB of local storage, in the form of one or more SSDs (SATA or NVMe), spinning disks, or both. See the Hardware section for details of the local storage available on specific node types at each cluster.
By default, all current CloudLab-provided OS images have a 64GB system (root) partition (partition 3) on the boot disk (old format images before May 2023 have only a 16GB system partition). The OS installs typically take up 1-3GBs of this space, leaving 50+GB of conveniently available storage (e.g., in /tmp). While this space is sufficient for many uses, there are times when more is desired.
10.2.1 Specifying Storage in a Profile – Local Datasets
If you know you will need additional storage before you create an experiment, then you can specify the storage needs in your profile by configuring one or more local datasets. See the Local Dataset example below. These datasets are automatically created by the CloudLab node configuration scripts at experiment instantiation. If you specify a mountpoint, the system will automatically create a filesystem in the dataset on first boot, and mount it on every boot.
Local datasets are implemented on Linux using LVM. When one or more datasets are required on a Linux node, the available storage on all drives is combined into an LVM volume group and individual datasets are allocated (striped across all involved disks) as logical volumes from that.
At this time, there is no way to specify redundancy on a local dataset. The LVM volume group and its corresponding logical volumes are effectively RAID0, and thus your experiment is susceptible to data loss due to a single disk failure. This is likely only a concern for long-lived (weeks or months) experiments.
10.2.2 Allocating Storage in a Running Experiment
If you are in a situation where an existing experiment needs more space (i.e., you did not specify a dataset in the profile), we provide a script that can be run to quickly create a new filesystem using the remaining space on the system (boot) disk:
sudo /usr/local/etc/emulab/mkextrafs.pl /mydata
This will provide you with anywhere from 90GB to 1TB, depending on the node type you are on.
It is also possible to use Linux tools to create your own partitions, filesystems, LVM, ZFS, RAID, or other storage configurations. You can also resize the OS partition on the boot disk using the setup-grow-rootfs script after setting the RESIZEROOT environment variable to specify the desired new size–either an explicit size (in GB) or zero to indicate "the rest of the available space". For example:
sudo RESIZEROOT=0 ./setup-grow-rootfs.sh
Note that manual creation of extra partitions or resizing the root partition are discouraged since the resulting configurations will only last until the experiment ends. These techniques may also create a disk configuration that cannot be persisted because the CloudLab imaging tools may not work with the resulting partitioning due to size or layout constraints.
10.2.3 Persisting Local Data
Since most CloudLab nodes are directly accessible from the Internet, you can use your favorite tools (e.g., tar/scp or rsync) to offload your data from a node to your home before the experiment, terminates. You can copy data from local disks to the shared NFS filesystem, but this practice is strongly discouraged.
You can also make your data part of a custom OS image. By placing it in a directory like /data, it will be included in any snapshot you make. Do not put it in your home directory on the node, or transient locations like /tmp or /var/tmp as those are not captured in snapshots. This practice of “baking” data into an OS image is generally not a good idea as it ties the data to a specific OS and can result in very large images which might put you over disk quota.
CloudLab does provide one way to persist local disk data in a format that can be loaded on future experiment nodes independent of the OS image used and can be exported to other clusters. These Image-backed Datasets are described next.
10.3 Image-backed Datasets
An image-backed dataset is a snapshot of a local dataset created using a CloudLab Disk Image. Since disk images can be used across clusters, an image-backed dataset is a convenient way of both persisting data from a node and enabling it to be used in different experiments on different clusters.
An image-backed dataset can be updated from any node on which it is installed by taking a snapshot as you would an OS image. However, image-backed datasets are not versioned, there is always only one version of the dataset across all clusters. Note also that creating a new version of the dataset does not affect other currently installed copies of the dataset on other nodes. While the portal will not allow simultaneous snapshots of the same dataset, it is ultimately up to the user to ensure consistency across uses of the dataset.
An image-backed dataset can be protected as readable (install-able) by just members of your project or by anyone. Independently, they can be protected as writable (update-able) either by just yourself or by members of your project.
Examples of creation, use and updating of an image-backed dataset are shown in the Storage Examples section.
Note that the size of image-backed datasets is limited by individual clusters. Typically, this limit is around 20GB of compressed data per image, so these datasets are not well suited to very large datasets.
Note also that image-backed datasets, like all CloudLab images, are in the custom frisbee format and cannot be easily examined or used outside of CloudLab. See the Disk Images section for an overview of CloudLab images.
10.4 Remote Datasets
Remote datasets are network accessible storage volumes. Specifically, they are hosted on per-cluster, infrastructure-provided storage servers and exposed to experiment nodes via the iSCSI protocol on the experiment network fabric. Most, but not all, cluster in CloudLab have at least one storage server. See the Hardware section for details on available remote storage at each cluster. A remote dataset appears on an experiment node as disk device, typically /dev/sdb or /dev/sdc, depending on how many local disks a node has. Multiple datasets will result in multiple disk devices.
Remote datasets are intended to provide access to a larger quantity of storage than what is available locally on most nodes. While the total space available on CloudLab storage servers is modest (20-100TB), it does at least allow for multi-TB datasets on nodes. Because these datasets are accessed as part of an experiment’s private network topology, the content is more secure and there is less impact on other experiments relative to sharing mechanisms that use the control network (e.g., the shared NFS filesystem).
An ephemeral remote dataset allows node-private storage larger than what is available on the local disks. They are created at experiment instantiation and destroyed at experiment termination.
Persistent remote datasets provide efficient access to remote storage that persists across experiment instantiations. Because the data resides remotely and does not need to be copied in at experiment startup and copied off at termination, it potentially allows large-data experiment instances to run for shorter lengths of time per instantiation. Simultaneous access to remote datasets by multiple nodes within and across experiments is also possible, with certain limitations. Read-only sharing of a dataset, or use of per-node read-write clones of a dataset, are always safe. Simultaneous read-write sharing of a remote dataset is possible, but almost certainly not what you want. Unless the OSes on all sharing nodes are coordinating their writes to the dataset, you will almost certainly wind up with a corrupted dataset. If you need a shared filesystem on persistent storage, see the example Shared Filesystem profile.
10.5 NFS Shared Filesystems
The original Emulab mechanism for sharing and persistence was a set of shared NFS filesystems hosted by an infrastructure server and accessed over the control network. This mechanism is still available in CloudLab, but only for the /proj hierarchy. While NFS provides an extremely easy to understand and use method for sharing and persisting data, it is extremely inefficient for some workloads such as those that are metadata intensive (e.g., creating lots of files when unpacking a tarball) or bandwidth intensive (e.g., simultaneous reading or writing of large files). This can place considerable load on a central shared resource and adversely affect other experiments and even the CloudLab control framework. For this reason, NFS is strongly discouraged for real-time data capture or logging.
10.6 Storage Type Summary (TL;DR)
The following table attempts to summary the various storage mechanisms and their attributes. Persistent indicates whether modified data remains after an experiment is terminated. Multi-node indicates if and how the data can be used by multiple nodes simultaneously, Capacity is the rough size of the storage available for an instance of the mechanism, Throughput is a rough estimate of the best-case (sequential) throughput of the storage mechanism, and Use Cases describes when the mechanism is appropriate and notes other characteristics.
Method |
| Persistent |
| Multi-node |
| Capacity |
| Throughput |
| Use Cases |
Per-node local root filesystem |
| No |
| No |
| ~10GB |
| 100-300MB/sec |
| Sufficient for the majority of experiments; no explicit setup required |
Per-node extra filesystem |
| No |
| No |
| 90GB to 1TB |
| 100-200MB/sec |
| When more than 10GB is needed; setup after experiment start; user must choose an appropriate node type; user must explicitly create |
Per-node local blockstore |
| No |
| No |
| 90GB to 40TB |
| 100-1000MB/sec |
| When up to 40TB is needed; specified by size in profile, system picks the node type; automatically setup; may stripe on multiple disks |
Image-backed dataset |
| Yes |
| Yes, all nodes get a copy |
| 10-20GB |
| 100-1000MB/sec |
| When persistence and local disk speed is needed, but not large capacity; must be snapshotted to save modifications |
Infrastruture-provided shared NFS filesystem |
| Yes |
| Yes, all nodes read-write share |
| up to 100GB |
| 20-100MB/sec |
| When true sharing is needed, use is discouraged for many-node or high IO-op experiments |
Ephemeral remote datasets |
| No |
| No |
| up to 10TB |
| 50-200MB/sec |
| When large capacity but not high throughput is needed on a single node |
Persistent remote datasets |
| Yes |
| Yes, all nodes can read-write share |
| up to 10TB |
| 50-200MB/sec |
| When persistence and large capacity but not high throughput are needed; read-write sharing between nodes requires @emph{extreme care}. |
Persistent remote dataset clones |
| No |
| Yes, all nodes get a copy |
| up to 10TB |
| 50-200MB/sec |
| When large scale sharing and large capacity but not persistence or high throughput are needed; clones are read-write but changes are not persistent |
10.7 Example Storage Profiles
10.7.1 Creating a Node-local Dataset
If you know in advance that you will need more that the ~10GB available on the root filesystem of any OS image, you can create a local dataset with a specified size as demonstrated in this profile:
"""This profile demonstrates how to add some extra *local* disk space on your node. In general nodes have much more disk space then what you see with `df` when you log in. That extra space is in unallocated partitions or additional disk drives. An *ephemeral blockstore* is how you ask for some of that space to be allocated and mounted as a **temporary** filesystem (temporary means it will be lost when you terminate your experiment). Instructions: Log into your node, your **temporary** file system in mounted at `/mydata`. """ # Import the Portal object. import geni.portal as portal # Import the ProtoGENI library. import geni.rspec.pg as rspec # Import the emulab extensions library. import geni.rspec.emulab # Create a Request object to start building the RSpec. request = portal.context.makeRequestRSpec() # Allocate a node and ask for a 30GB file system mounted at /mydata node = request.RawPC("node") node.disk_image = "urn:publicid:IDN+emulab.net+image+emulab-ops//UBUNTU16-64-STD" bs = node.Blockstore("bs", "/mydata") bs.size = "30GB" # Print the RSpec to the enclosing page. portal.context.printRequestRSpec() Open this profile on CloudLab"""This profile demonstrates how to add some extra *local* disk space on your node. In general nodes have much more disk space then what you see with `df` when you log in. That extra space is in unallocated partitions or additional disk drives. An *ephemeral blockstore* is how you ask for some of that space to be allocated and mounted as a **temporary** filesystem (temporary means it will be lost when you terminate your experiment). Instructions: Log into your node, your **temporary** file system in mounted at `/mydata`. """ # Import the Portal object. import geni.portal as portal # Import the ProtoGENI library. import geni.rspec.pg as rspec # Import the emulab extensions library. import geni.rspec.emulab # Create a Request object to start building the RSpec. request = portal.context.makeRequestRSpec() # Allocate a node and ask for a 30GB file system mounted at /mydata node = request.RawPC("node") node.disk_image = "urn:publicid:IDN+emulab.net+image+emulab-ops//UBUNTU16-64-STD" bs = node.Blockstore("bs", "/mydata") bs.size = "30GB" # Print the RSpec to the enclosing page. portal.context.printRequestRSpec()
Instantiating this profile will give you a single node with a dataset containing an empty filesystem mounted at /mydata.
10.7.2 Creating an Image-backed Dataset from a Node-local Dataset
If you have created a node-local dataset as described above and populated it, then you can persist it by creating a new image-backed dataset. Click on the "Create Dataset" option in the Storage menu. This will bring up the form to create a new dataset:
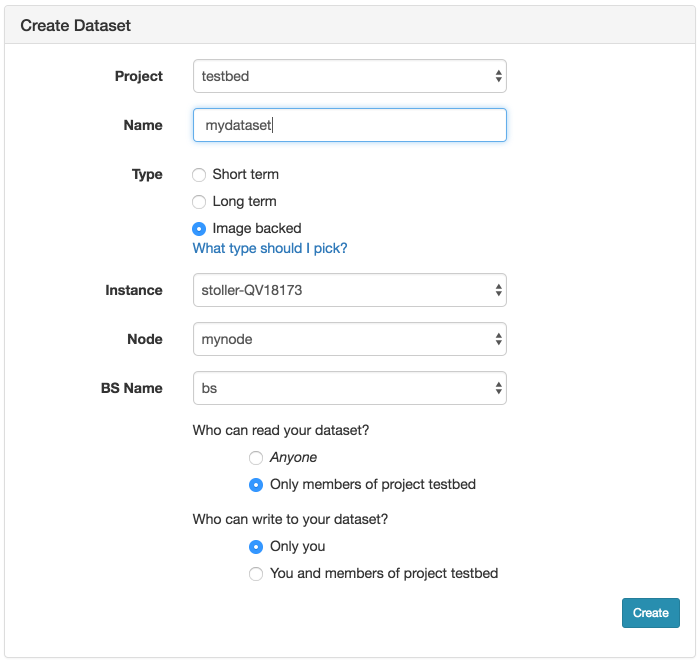
As shown, choose a name for your dataset and optionally the project the dataset should be associated with. Be sure to select Image Backed for the type. Then choose the experiment (Instance), which node in the experiment (Node), and which local dataset on the node (BS Name). The dataset name will be the first argument to the node.Blockstore method invocation in the profile used to create the local dataset (bs in the example above).
Before clicking the Create button, make sure that you have no processes running on the node and accessing the mounted filesystem. This might include processes logging to a file in that filesystem or your interactive shell if you are cd’ed to that directory. If you do not do this, the image creation will fail when it tries to unmount the filesystem to ensure a consistent snapshot.
After clicking Create, the process can take several minutes or longer, depending on the size of the file system. Progress will be displayed on the page:
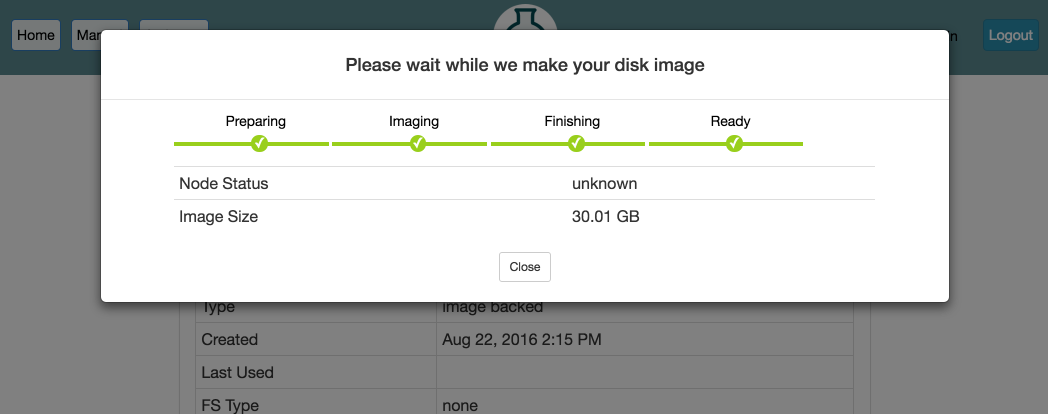
When the progress bar reaches the Ready stage, your new dataset is ready! It will now show up in your Storage drop-down under My Datasets and can be used in new experiments.
10.7.3 Using and Updating an Image-backed Dataset
To use an existing image-backed dataset, you will need to reference it in your profile, as demonstrated in:
"""An example of an image backed dataset. The dataset name and mountpoint can be customized when you instantiate the profile. Instructions: Log into your node, your dataset filesystem is in the directory you specified during profile instantiation.""" # Import the Portal object. import geni.portal as portal # Import the ProtoGENI library. import geni.rspec.pg as pg # Import the emulab extensions library. import geni.rspec.emulab # Create a portal context, needed to defined parameters pc = portal.Context() # Create a Request object to start building the RSpec. request = pc.makeRequestRSpec() pc.defineParameter("DATASET", "URN of your image-backed dataset", portal.ParameterType.STRING, "urn:publicid:IDN+emulab.net:testbed+imdataset+pgimdat") pc.defineParameter("MPOINT", "Mountpoint for file system", portal.ParameterType.STRING, "/mydata") params = pc.bindParameters() node = request.RawPC("mynode") node.disk_image = 'urn:publicid:IDN+emulab.net+image+emulab-ops//UBUNTU16-64-STD' bs = node.Blockstore("bs", params.MPOINT) bs.dataset = params.DATASET pc.printRequestRSpec(request)Open this profile on CloudLab"""An example of an image backed dataset. The dataset name and mountpoint can be customized when you instantiate the profile. Instructions: Log into your node, your dataset filesystem is in the directory you specified during profile instantiation.""" # Import the Portal object. import geni.portal as portal # Import the ProtoGENI library. import geni.rspec.pg as pg # Import the emulab extensions library. import geni.rspec.emulab # Create a portal context, needed to defined parameters pc = portal.Context() # Create a Request object to start building the RSpec. request = pc.makeRequestRSpec() pc.defineParameter("DATASET", "URN of your image-backed dataset", portal.ParameterType.STRING, "urn:publicid:IDN+emulab.net:testbed+imdataset+pgimdat") pc.defineParameter("MPOINT", "Mountpoint for file system", portal.ParameterType.STRING, "/mydata") params = pc.bindParameters() node = request.RawPC("mynode") node.disk_image = 'urn:publicid:IDN+emulab.net+image+emulab-ops//UBUNTU16-64-STD' bs = node.Blockstore("bs", params.MPOINT) bs.dataset = params.DATASET pc.printRequestRSpec(request)
This profile takes the dataset URN to use as a parameter during instantiation. You can find the URN for your dataset on the information page for the dataset. From the Storage drop-down, click on My Datasets, find the name of your dataset in the list, and click on it.
Once instantiated, the dataset will be accessible under /mydata (or whatever mountpoint you specified).
If you make changes and want to preserve them, you can update your dataset by using the Modify button on the My Datasets page for the dataset in question.
10.7.4 Creating a Remote Dataset
Creating a remote dataset is very similar to the process just described for creating an image-backed dataset. Click on the "Create Dataset" option in the Storage drop-down menu. This will bring up the form to create a new dataset:
Screenshot TBD
Choose a name for your dataset and optionally the project the dataset should be associated with.
Select Short term or Long term as the Type depending on your needs (click on “Which type should I pick” for more info).
Pick a Size, keeping in mind that sizes in excess of 1TB are likely to require administrative approval.
Pick the Cluster at which the dataset will be created. Recall that remote datasets are specific to a cluster and can only be used by nodes at that cluster.
If you selected a short-term dataset, you will need to fill in the expiration date (Expires), again keeping in mind that dates more than 1-2 weeks in the future will require administrative approval.
Pick the initial filesystem type you would like created on the dataset. Almost certainly you will want to use the default ext4. It is not necessary to create a filesystem (choose “none”) if you want to use the dataset as a raw disk or if you want to create your own filesystem on it when you first use it. Note however, if you do not choose a filesystem now, then you cannot set a mountpoint when you first use the dataset.
Finally, select the read and write permissions for the dataset.
After clicking Create, you may get a message informing you Your dataset needs to be approved! and giving you a reason why. If this is the case, your dataset will be shown as “unapproved” and you can either let it go and see if it is approved by CloudLab administrators, or you can Delete and try again with different parameters. (Note that Modify will only allow you to change the permission settings and cannot be used to alter the size or duration of the dataset.) The creation process can take several minutes or longer, depending on whether you specified a filesystem and what its size and type are.
Once it shows up in your My Datasets list as valid, you can use it in new experiments.
10.7.5 Using a Remote Dataset on a Single Node
Once you have created a remote dataset, you can make use of it in experiments. In many situations, you may only need to use the dataset on a single node. This is certainly the case after you have just created the dataset and need to populate it. This following profile demonstrates how to use a remote dataset:
"""This profile demonstrates how to use a remote dataset on your node, either a long term dataset or a short term dataset, created via the Portal. Instructions: Log into your node, your dataset file system in mounted at `/mydata`. """ # Import the Portal object. import geni.portal as portal # Import the ProtoGENI library. import geni.rspec.pg as rspec # Import the emulab extensions library. import geni.rspec.emulab # Create a Request object to start building the RSpec. request = portal.context.makeRequestRSpec() # Add a node to the request. node = request.RawPC("node") # We need a link to talk to the remote file system, so make an interface. iface = node.addInterface() # The remote file system is represented by special node. fsnode = request.RemoteBlockstore("fsnode", "/mydata") # This URN is displayed in the web interfaace for your dataset. fsnode.dataset = "urn:publicid:IDN+emulab.net:portalprofiles+ltdataset+DemoDataset" # # The "rwclone" attribute allows you to map a writable copy of the # indicated SAN-based dataset. In this way, multiple nodes can map # the same dataset simultaneously. In many situations, this is more # useful than a "readonly" mapping. For example, a dataset # containing a Linux source tree could be mapped into multiple # nodes, each of which could do its own independent, # non-conflicting configure and build in their respective copies. # Currently, rwclones are "ephemeral" in that any changes made are # lost when the experiment mapping the clone is terminated. # #fsnode.rwclone = True # # The "readonly" attribute, like the rwclone attribute, allows you to # map a dataset onto multiple nodes simultaneously. But with readonly, # those mappings will only allow read access (duh!) and any filesystem # (/mydata in this example) will thus be mounted read-only. Currently, # readonly mappings are implemented as clones that are exported # allowing just read access, so there are minimal efficiency reasons to # use a readonly mapping rather than a clone. The main reason to use a # readonly mapping is to avoid a situation in which you forget that # changes to a clone dataset are ephemeral, and then lose some # important changes when you terminate the experiment. # #fsnode.readonly = True # Now we add the link between the node and the special node fslink = request.Link("fslink") fslink.addInterface(iface) fslink.addInterface(fsnode.interface) # Special attributes for this link that we must use. fslink.best_effort = True fslink.vlan_tagging = True # Print the RSpec to the enclosing page. portal.context.printRequestRSpec()Open this profile on CloudLab"""This profile demonstrates how to use a remote dataset on your node, either a long term dataset or a short term dataset, created via the Portal. Instructions: Log into your node, your dataset file system in mounted at `/mydata`. """ # Import the Portal object. import geni.portal as portal # Import the ProtoGENI library. import geni.rspec.pg as rspec # Import the emulab extensions library. import geni.rspec.emulab # Create a Request object to start building the RSpec. request = portal.context.makeRequestRSpec() # Add a node to the request. node = request.RawPC("node") # We need a link to talk to the remote file system, so make an interface. iface = node.addInterface() # The remote file system is represented by special node. fsnode = request.RemoteBlockstore("fsnode", "/mydata") # This URN is displayed in the web interfaace for your dataset. fsnode.dataset = "urn:publicid:IDN+emulab.net:portalprofiles+ltdataset+DemoDataset" # # The "rwclone" attribute allows you to map a writable copy of the # indicated SAN-based dataset. In this way, multiple nodes can map # the same dataset simultaneously. In many situations, this is more # useful than a "readonly" mapping. For example, a dataset # containing a Linux source tree could be mapped into multiple # nodes, each of which could do its own independent, # non-conflicting configure and build in their respective copies. # Currently, rwclones are "ephemeral" in that any changes made are # lost when the experiment mapping the clone is terminated. # #fsnode.rwclone = True # # The "readonly" attribute, like the rwclone attribute, allows you to # map a dataset onto multiple nodes simultaneously. But with readonly, # those mappings will only allow read access (duh!) and any filesystem # (/mydata in this example) will thus be mounted read-only. Currently, # readonly mappings are implemented as clones that are exported # allowing just read access, so there are minimal efficiency reasons to # use a readonly mapping rather than a clone. The main reason to use a # readonly mapping is to avoid a situation in which you forget that # changes to a clone dataset are ephemeral, and then lose some # important changes when you terminate the experiment. # #fsnode.readonly = True # Now we add the link between the node and the special node fslink = request.Link("fslink") fslink.addInterface(iface) fslink.addInterface(fsnode.interface) # Special attributes for this link that we must use. fslink.best_effort = True fslink.vlan_tagging = True # Print the RSpec to the enclosing page. portal.context.printRequestRSpec()
You can find the URN for your dataset on the information page for the dataset. From the Storage drop-down, click on My Datasets, find the name of your dataset in the list, and click on it.
Note the “fslink” settings best_effort and vlan_tagging. These should always be set since some node types have only a single experimental interface. Since the remote dataset uses a network link and your experiment topology might also include a LAN with multiple nodes (see the following examples for multiple nodes), both uses will need to share the physical interface.
10.7.6 Using a Remote Dataset on Multiple Nodes via a Shared Filesystem
You cannot simply create a filesystem in a persistent remote dataset and directly share that among nodes in an experiment. If you want to share a standard Linux filesystem among nodes in an experiment, you can instead have one node in your experiment map the dataset read-write and have it act as an NFS server, exporting the dataset filesystem to all other nodes in the experiment via NFS on a shared LAN. This profile configures such an experiment with a variable number of client nodes:
"""This profile sets up a simple NFS server and a network of clients. The NFS server uses a long term dataset that is persistent across experiments. In order to use this profile, you will need to create your own dataset and use that instead of the demonstration dataset below. If you do not need persistant storage, we have another profile that uses temporary storage (removed when your experiment ends) that you can use. Instructions: Click on any node in the topology and choose the `shell` menu item. Your shared NFS directory is mounted at `/nfs` on all nodes.""" # Import the Portal object. import geni.portal as portal # Import the ProtoGENI library. import geni.rspec.pg as pg # Import the Emulab specific extensions. import geni.rspec.emulab as emulab # Create a portal context. pc = portal.Context() # Create a Request object to start building the RSpec. request = pc.makeRequestRSpec() # Only Ubuntu images supported. imageList = [ ('urn:publicid:IDN+emulab.net+image+emulab-ops//UBUNTU18-64-STD', 'UBUNTU 18.04'), ('urn:publicid:IDN+emulab.net+image+emulab-ops//UBUNTU16-64-STD', 'UBUNTU 16.04'), ('urn:publicid:IDN+emulab.net+image+emulab-ops//CENTOS7-64-STD', 'CENTOS 7'), ] # Do not change these unless you change the setup scripts too. nfsServerName = "nfs" nfsLanName = "nfsLan" nfsDirectory = "/nfs" # Number of NFS clients (there is always a server) pc.defineParameter("clientCount", "Number of NFS clients", portal.ParameterType.INTEGER, 2) pc.defineParameter("osImage", "Select OS image", portal.ParameterType.IMAGE, imageList[2], imageList) # Always need this when using parameters params = pc.bindParameters() # The NFS network. All these options are required. nfsLan = request.LAN(nfsLanName) nfsLan.best_effort = True nfsLan.vlan_tagging = True nfsLan.link_multiplexing = True # The NFS server. nfsServer = request.RawPC(nfsServerName) nfsServer.disk_image = params.osImage # Attach server to lan. nfsLan.addInterface(nfsServer.addInterface()) # Initialization script for the server nfsServer.addService(pg.Execute(shell="sh", command="sudo /bin/bash /local/repository/nfs-server.sh")) # Special node that represents the ISCSI device where the dataset resides dsnode = request.RemoteBlockstore("dsnode", nfsDirectory) dsnode.dataset = "urn:publicid:IDN+emulab.net:portalprofiles+ltdataset+DemoDataset" # Link between the nfsServer and the ISCSI device that holds the dataset dslink = request.Link("dslink") dslink.addInterface(dsnode.interface) dslink.addInterface(nfsServer.addInterface()) # Special attributes for this link that we must use. dslink.best_effort = True dslink.vlan_tagging = True dslink.link_multiplexing = True # The NFS clients, also attached to the NFS lan. for i in range(1, params.clientCount+1): node = request.RawPC("node%d" % i) node.disk_image = params.osImage nfsLan.addInterface(node.addInterface()) # Initialization script for the clients node.addService(pg.Execute(shell="sh", command="sudo /bin/bash /local/repository/nfs-client.sh")) pass # Print the RSpec to the enclosing page. pc.printRequestRSpec(request) """This profile sets up a simple NFS server and a network of clients. The NFS server uses a long term dataset that is persistent across experiments. In order to use this profile, you will need to create your own dataset and use that instead of the demonstration dataset below. If you do not need persistant storage, we have another profile that uses temporary storage (removed when your experiment ends) that you can use. Instructions: Click on any node in the topology and choose the `shell` menu item. Your shared NFS directory is mounted at `/nfs` on all nodes.""" # Import the Portal object. import geni.portal as portal # Import the ProtoGENI library. import geni.rspec.pg as pg # Import the Emulab specific extensions. import geni.rspec.emulab as emulab # Create a portal context. pc = portal.Context() # Create a Request object to start building the RSpec. request = pc.makeRequestRSpec() # Only Ubuntu images supported. imageList = [ ('urn:publicid:IDN+emulab.net+image+emulab-ops//UBUNTU18-64-STD', 'UBUNTU 18.04'), ('urn:publicid:IDN+emulab.net+image+emulab-ops//UBUNTU16-64-STD', 'UBUNTU 16.04'), ('urn:publicid:IDN+emulab.net+image+emulab-ops//CENTOS7-64-STD', 'CENTOS 7'), ] # Do not change these unless you change the setup scripts too. nfsServerName = "nfs" nfsLanName = "nfsLan" nfsDirectory = "/nfs" # Number of NFS clients (there is always a server) pc.defineParameter("clientCount", "Number of NFS clients", portal.ParameterType.INTEGER, 2) pc.defineParameter("osImage", "Select OS image", portal.ParameterType.IMAGE, imageList[2], imageList) # Always need this when using parameters params = pc.bindParameters() # The NFS network. All these options are required. nfsLan = request.LAN(nfsLanName) nfsLan.best_effort = True nfsLan.vlan_tagging = True nfsLan.link_multiplexing = True # The NFS server. nfsServer = request.RawPC(nfsServerName) nfsServer.disk_image = params.osImage # Attach server to lan. nfsLan.addInterface(nfsServer.addInterface()) # Initialization script for the server nfsServer.addService(pg.Execute(shell="sh", command="sudo /bin/bash /local/repository/nfs-server.sh")) # Special node that represents the ISCSI device where the dataset resides dsnode = request.RemoteBlockstore("dsnode", nfsDirectory) dsnode.dataset = "urn:publicid:IDN+emulab.net:portalprofiles+ltdataset+DemoDataset" # Link between the nfsServer and the ISCSI device that holds the dataset dslink = request.Link("dslink") dslink.addInterface(dsnode.interface) dslink.addInterface(nfsServer.addInterface()) # Special attributes for this link that we must use. dslink.best_effort = True dslink.vlan_tagging = True dslink.link_multiplexing = True # The NFS clients, also attached to the NFS lan. for i in range(1, params.clientCount+1): node = request.RawPC("node%d" % i) node.disk_image = params.osImage nfsLan.addInterface(node.addInterface()) # Initialization script for the clients node.addService(pg.Execute(shell="sh", command="sudo /bin/bash /local/repository/nfs-client.sh")) pass # Print the RSpec to the enclosing page. pc.printRequestRSpec(request)
10.7.7 Using a Remote Dataset on Multiple Nodes via Clones
TBD.